Tuesday, May 31, 2011

Clean The Sprocket and Pull The Drive Sprocket Cover

Before:


After:


On Sunday I decided to finish up the rear wheel assembly cleanup and get the rear wheel back on the bike.  I was also going to give another shot at pulling the drive sprocket cover.   There really isn't too much to say about the cleanup process, I used a combination of Brakleen (brake parts cleaner) and WD-40 as solvents and just used a series of brushes and rags to get the end result.  Here are the pictures of the work.


The cush-drive assembly:


Always replace cotter pins with new ones instead of re-bending old ones!


Once I got the rear wheel back on I directed my attention to the drive sprocket cover.  I was the previous day I was running into issues with three Phillips-head Bolts that were pretty darn stuck, so I hit them with the PB Blaster and let them soak overnight.  Today they were being no less stubborn and the Phillips-heads were pretty much destroyed.


So I decided to drill out the heads and get them out later by either using a vise grips on the remainder of the bolt or an ez-out if there wasn't enough left to get a hold of.  A couple of things; firstly always wear safety glasses when you are doing stuff like this, I broke two drill bits in this process and any one of those could have sent something flying into my eye.  Secondly Start with a large enough bit that it doesn't get caught in the remainder of the Phillips' "cross," thus breaking your drill bits!  Once I got the heads drilled out I found a disgusting mess inside the cover and engine case area.


I had intended to proceed with the extraction of the bolts but I managed to pinch my fingertip in a Vise-grip pliers and that was signal enough that is was time to take a break for the day!

Up for the next post I put the drive sprocket mess on the back burner with the carbs and stay focused on getting the front inner tube changed and the new handlebars mounted.  And I make a video this time of the tube changing process!

Stay tuned I should have that posted tomorrow, and thanks for reading!


Monday, May 30, 2011

New Handlebars and New Tubes


On Friday I went to my favorite local motorcycle shop (Madison Motorsports) to get some new inner tubes for oldbike as well as to see if Steve Parker my veteran source for GS 425 info might happen to have some emulsifier tune o-rings laying around.  Now, when I purchased my battery I went to Engelhart’s because that was where my wife, god bless her got me a $50 gift card for as a gift for Valentine’s Day.  When I was there I inquired about inner tubes for the bike which they did have but they insisted that my bike had an 18” front wheel.  I was pretty sure that I had a 19’ but I figured that I would check as I was in no rush to get them so I left with the new battery in hand and the price of $16.95 a tire (Engelhart’s price) in my head.

I am glad that I did not buy out of convenience because Steve and Judy (the owners of Madison Motorsports) were asking almost half as much for an inner tune as Engelhart’s was ($8.95)!  Now I don’t have a lot of bike expenses in a year but when I do I try to go to these guys because they generally can come close to or sometimes even match internet prices and they know my name and that says a lot to me.  Plus in general Steve and Judy are just good people, and if it’s not too busy a day they are happy to share a story or to hear one!  While I was there some MX/Off-road bars caught my eye and being as it is that my bike is not necessarily going to be a cafĂ© bike per-se I figured that at $15.95 for the bars I could at least take them home for a test fit to see how I liked them.

On Saturday I decided that I should probably get the more necessary work (the inner tubes) started before I got to the fun work (the handlebars).  So the first step was to take off the chain, so I initially started with the intent of taking off the drive sprocket cover.


First I took off the shift lever.


Unfortunately the rest of the process was knackered by some stubborn Phillips head screws so I figured for the time being I did not need to address that issue as I will only need that off for when I am putting the chain back on, so I hit it with some PB Blaster spray and moved on to taking off the chain.  Luckily this was not the stock chain (which did not have a master link) so it was as simple as removing the retaining clip and popping out the master link.


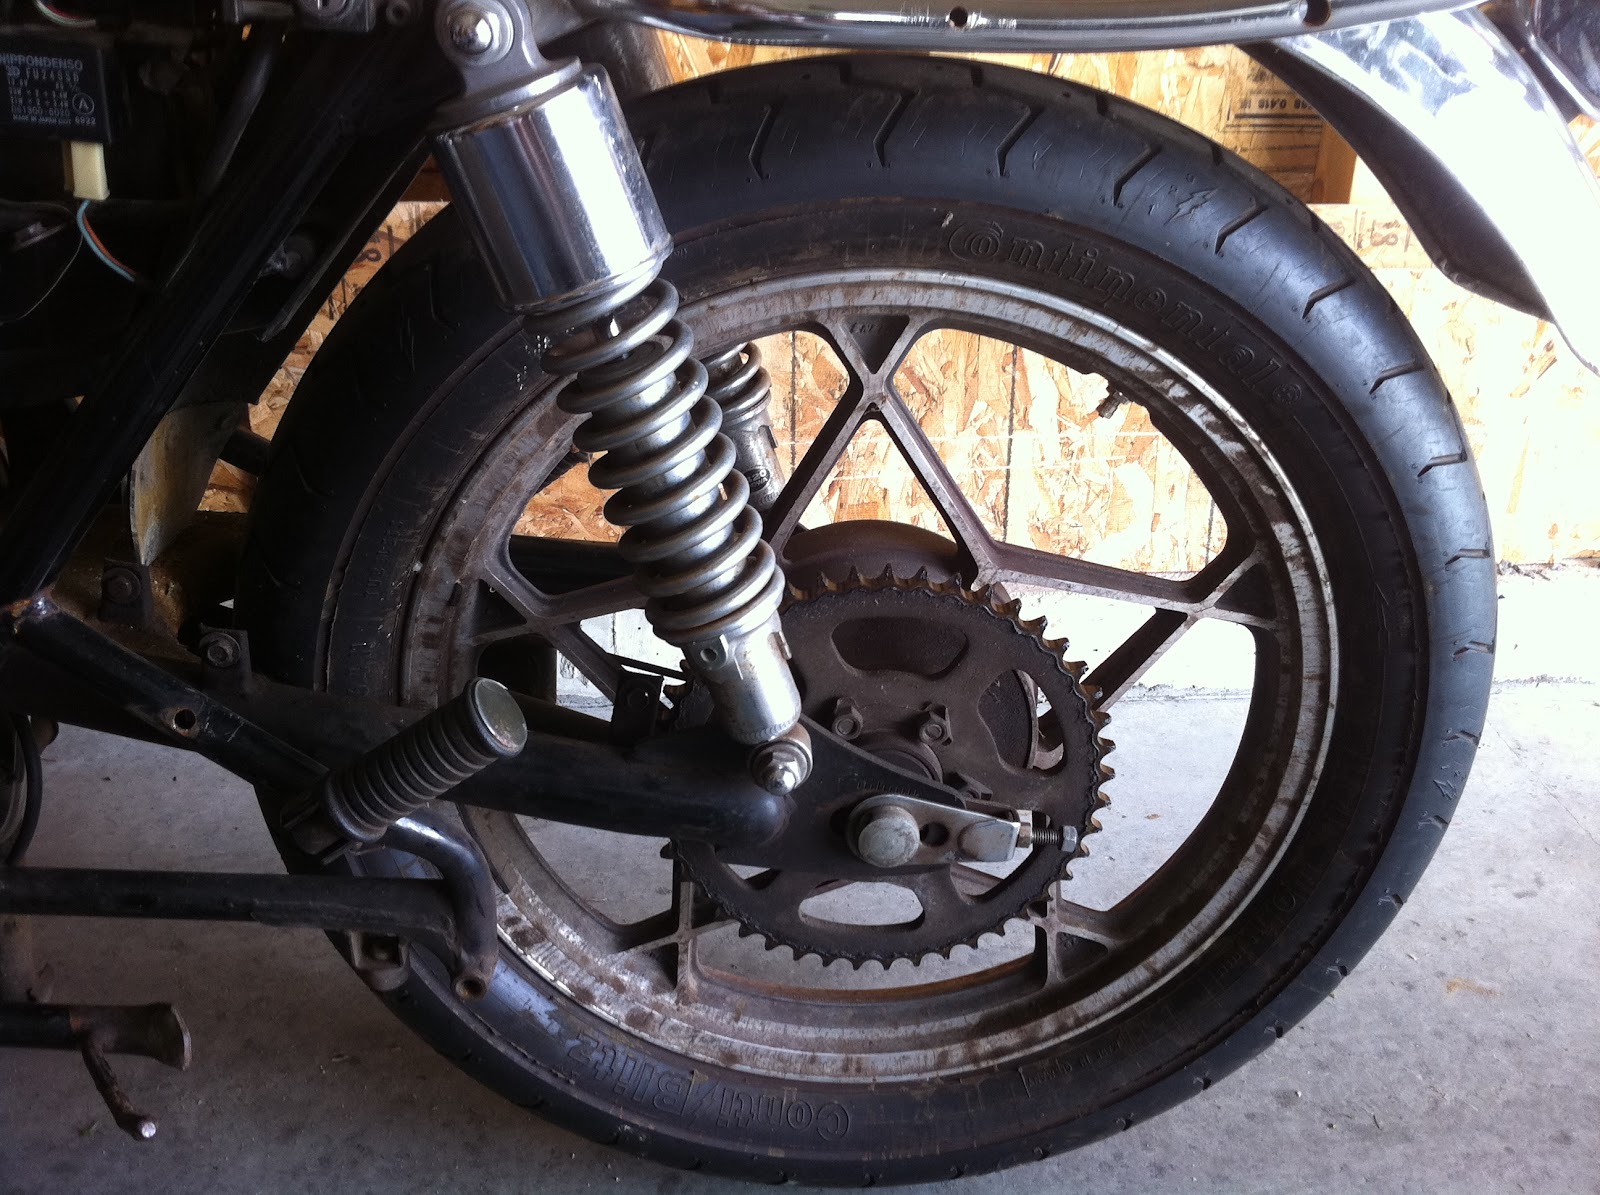
After I got the chain off the next step in freeing up the rear wheel is to take the linkages off from the drum brake assembly.  There are two; the actuator linkage and the stabilizer linkage both have to be removed.  The skinnier one with the spring on it is the break lever actuator is the skinnier one with the spring on it and the thicker one at the very bottom is the stabilizer linkage.


This small nut (below) is used to adjust the brake, the tighter you make it the faster the brake responds to pressure on the pedal.


There is a cotter pin (below) that keeps the brake stabilizer nut from backing out all the way. You can pull that with a needle nose pliers and take the nut off.


Once you have the two linkages freed up you can take the cotter pin out of the castle nut on the axle and remove the castle nut.


This is one of the times I use a "farmers helper," crescent wrench.


The axle runs through the chain tensioners which sandwich each side of the swing arm will drop down as you pull the wheel back in the elongated holes that allow for chain tension adjustment.


Once you pull the axle it is a good idea to keep stuff in the order it went on.


Here are some pics with the rear wheel removed, center stands make for easy wheel changes!


There is a lot of mess on the drive side of the wheel.


The brake side is pretty clean.


Here are some shots of the braking assembly.


I wish I would have set up a camera to show the process it took to break the bead on the tire, but really how many of you would have liked to see me struggle for an hour with a tire!  Basically I let the air out of the tire and used some quick clamps to pinch the bead down and get a screw driver under the bead and then used that to pull the bead out far enough to get a breaker bar under the bead.  Once I got to that point I put a long pipe on the breaker bar and then put the axle back in the wheel and used it as a fulcrum point to spin the breaker bar around the bead thus popping the bead off the rim.  Sounds simple, right?  It was a pain in the ass and to figure out that process took a lot of trial and error.  It would have been good to invest in some tire change spoons.

Now why didn't I take it to a shop to put the tube in?  It turns out that most shops don't want to  deal with old rubber and are quite insistent on selling you new tires.  I think the tires on my bike are just fine (though mismatched)  and will definitely be good enough to roll around in the garage and once it is rideable I will reassess and decide what, if anything, needs to be done about the rubber.  Luckily to change the tube I only needed to get one bead off the rim in order to stuff the tube in and then put that bead back over the rim.  After I got the tire half-off Mu suspicions that the previous owner had tried to convert the rims to tubeless were confirmed.


I basically treated the tube insertion the same as what I do on my bicycles; inflate the tube so it holds its shape and line up the valve with the hole and get that through the rim first.  Once that is done all you have to do is work your way around the rim tucking the tube into the tire.


Interesting... the "star rims" are made by Enkei!


Once you have the tube in the tire you can start to put the bead back on the rim being CAREFUL to NOT PINCH the inner tube.  I had luck getting about 2/3 of the bead back on by hand but that is the easy part.  The rest of the job was left to the breaker bar a 4lb deadblow hammer and some muscle.  The end product looks pretty much the same as what you started with unless you take the opportunity to clean the rim, which I did.


That is as far as I got that day I was pretty beat after fighting with that tire and rim for 2 hours and my back was feeling pretty stiff from being hunched over for so long.  In my next update I will cover cleaning the sprocket and cush-drive and also I finally get the drive sprocket cover off after drilling out three screws.  The tube replacement seems to be generating a lot of extra "projects" as I go so it might be a bit before I get the handlebars on but I still have till the third of June before my best run of shifts so maybe I can still get there before that happens.  Till I get the "work" done the fun will have to wait!


Thanks again for reading!

Friday, May 27, 2011

Out Go the Carbs Again


Last Sunday after getting the bike to run on it’s own for the first time I figured that it was finally time to address the fact that I forgot to take a few parts out of the carbs and check all of the cast vacuum lines to be sure that they are free flowing and also to bench synch the carbs too.

I pulled out the cam chain tensioner again to allow for clearance when removing the carbs.


Here is a detailed shot (below) of the tensioner retaining screw.  Basically you want to loosen the large set nut and then tighten in the retaining screw and retighten the set nut.  If you do not tighten the retaining screw the plunger and spring will come out and you will have to re-assemble the tensioner.

After I got the tensioner out I pulled the carbs.


I disassembled the left carb first.


When I pulled the emulsifier tube I found that the o-ring had been degraded probably from me not taking it out the first time and letting the carb cleaner wreck the rubber.


I am going to order 2 of these before I get the other carb apart as I am assuming the same thing has happened on the other side too.  So until I get the o-rings this carb work is on the back burner.


I do have some other things in the works though, including a new set of handlebars and new tubes for the tires so check back in the near future and there will be a post detailing those developments!

Thanks again for reading!

Sunday, May 22, 2011

One Minute of Reward

After a few helpful tips from members of Caferacer.net and a reader of the blog, I finally got the timing set on the GS.  For others that might be trying to set the static timing on a GS;  I had to attach the alligator clips to the points on the picture below in order to get the continuity test to work.  The red point being for the left cylinder and the green for the right.  It really doesn't matter where the positive and negative go as all you are doing is testing when the circuit is closed and when it is open.


The next step in the Clymer Manual was to clean and oil the air filter.  So that was what I set about doing.  In the pic below you can see the intake which is nestled deep below the seat on and with a rearward facing inlet.  Suzuki really did not want any turbulent air getting to the carbs.


Removing the two screws grants you access to reusable the air filter, a steel basket with a foam element that some larger holes and then a last ditch protection screen that covers the exit of the filter.  The single Phillips screw holds the filter in place, loosening it will allow you to extract the filter.


After getting the filter out, it is clear that the foam has seen better days.  In the pic below you can see the band that is meant to hold the foam element in place and see how loose it is on there, evidence of a filter element that was once much more supple?


Below you can see the exit of the air filter and the protective screen. as well as the larger holes that the filter element sits on.


Removing the retaining band is a matter of just pressing it in and working it loose from the slot that is hooks into.  That will allow you to take out the foam element.


The Clymer Manual says to use some degreaser on the filter element first and then to wash it with soap and water taking care to not twist or wring out the element.


There were a lot of holes in my filter element, as I am not sure what my plans are for the bike this will have to do for now.  The manual says to press it flat between two paper towels to expedite the drying process.


I had some downtime while the filter was drying so I decided to see how the timing adjustment affected the bike's starting.  I should have brought the video camera down for this but in all honesty I feel a little dorky recording myself when my wife is around.  It's dorky when she isn't too but at least it's just me to see it!  My first impressions were that it did want to fire easier and that with a little blip of the throttle it came to life.  I was still having to keep the throttle open to get the bike to run so I finally took a good look at the idle speed adjuster screw and adjusted right to the point where it made contact with the throttle opening linkage, and started it again (Still needing to blip the throttle to get it going) and with a little adjusting I got the idle set and the bike ran for about a minute and thirty seconds on its own at 1,200 RPMs!  That felt great, eventually it stalled again and I was able to get it going a few more times before the battery konked out.  I am having issues with the throttle sticking too so that will need to be looked into.  My next step is to take apart the carbs and re-check all the tiny vacuum holes and a member over at Caferacer.net pointed out that I didn't remove a few pieces during my cleaning process so I want to do my due diligence and make sure I know absolutely everything  is clean and free flowing.  I actually have part of that process done already so stay tuned for another update later this week!.