
As I mentioned in the previous video I had decided to go ahead and repair the tears in the stock “king and queen” seat that came with the GS. My main reason being that I am not entirely sure what direction this project is going to take just yet and if I can get the thing running reliably I might be riding it to and from work and around a bit just to get a feel for the bike and say what you will about the sheer and utter ugliness of the “king and queen” seat (I know I have) they are pretty darn comfortable. I think that as I ride it about it will tell me what it really wants to be. That being said I have never repaired a torn motorcycle seat before but it didn’t seem too intimidating so I figured I’d rather be riding a bike with a repaired seat than a torn seat.
In addition to the tear in the top of the seat (Above) there were two tears in the bottom most portion on each side of the seat where the seat material folds around the metal seat pan.


The seat cover is basically stretched over the Styrofoam seat padding and pan. The outside edge of the seat cover has a decent sized wire stitched into the edge that runs around the whole cover. Basically the assembler pulls the edge of the seat over the “hooks” punched out of the seat pan and as you can see in the picture (below), the hook then goes through the material and is held in place by the wire that is stitched around the seat cover.

Then it stands to reason that in order to remove the seat cover, all you have to do is pull the edges of the seat cover off the “hooks” and take the seat cover off the seat pan and Styrofoam padding. There was some adhesive that was used during the original assembly of the seat that put up very little fight when removing the cover as well. After I removed the cover you can see the resulting two pieces in the picture (below). The plastic looking “stuff’ on the inside of the seat cover and on the Styrofoam padding I thing when the seat was new was all attached to where the black lines between the foam on the seat cover and served as a barrier between the two foams and probably served as a place to spray the seat adhesive. Unfortunately over the last 31 tears the plastic has degraded and this is the result.

Pushing ahead I removed all the old brittle plastic from both the seat cover and seat padding and the pic (below) shows the end result.

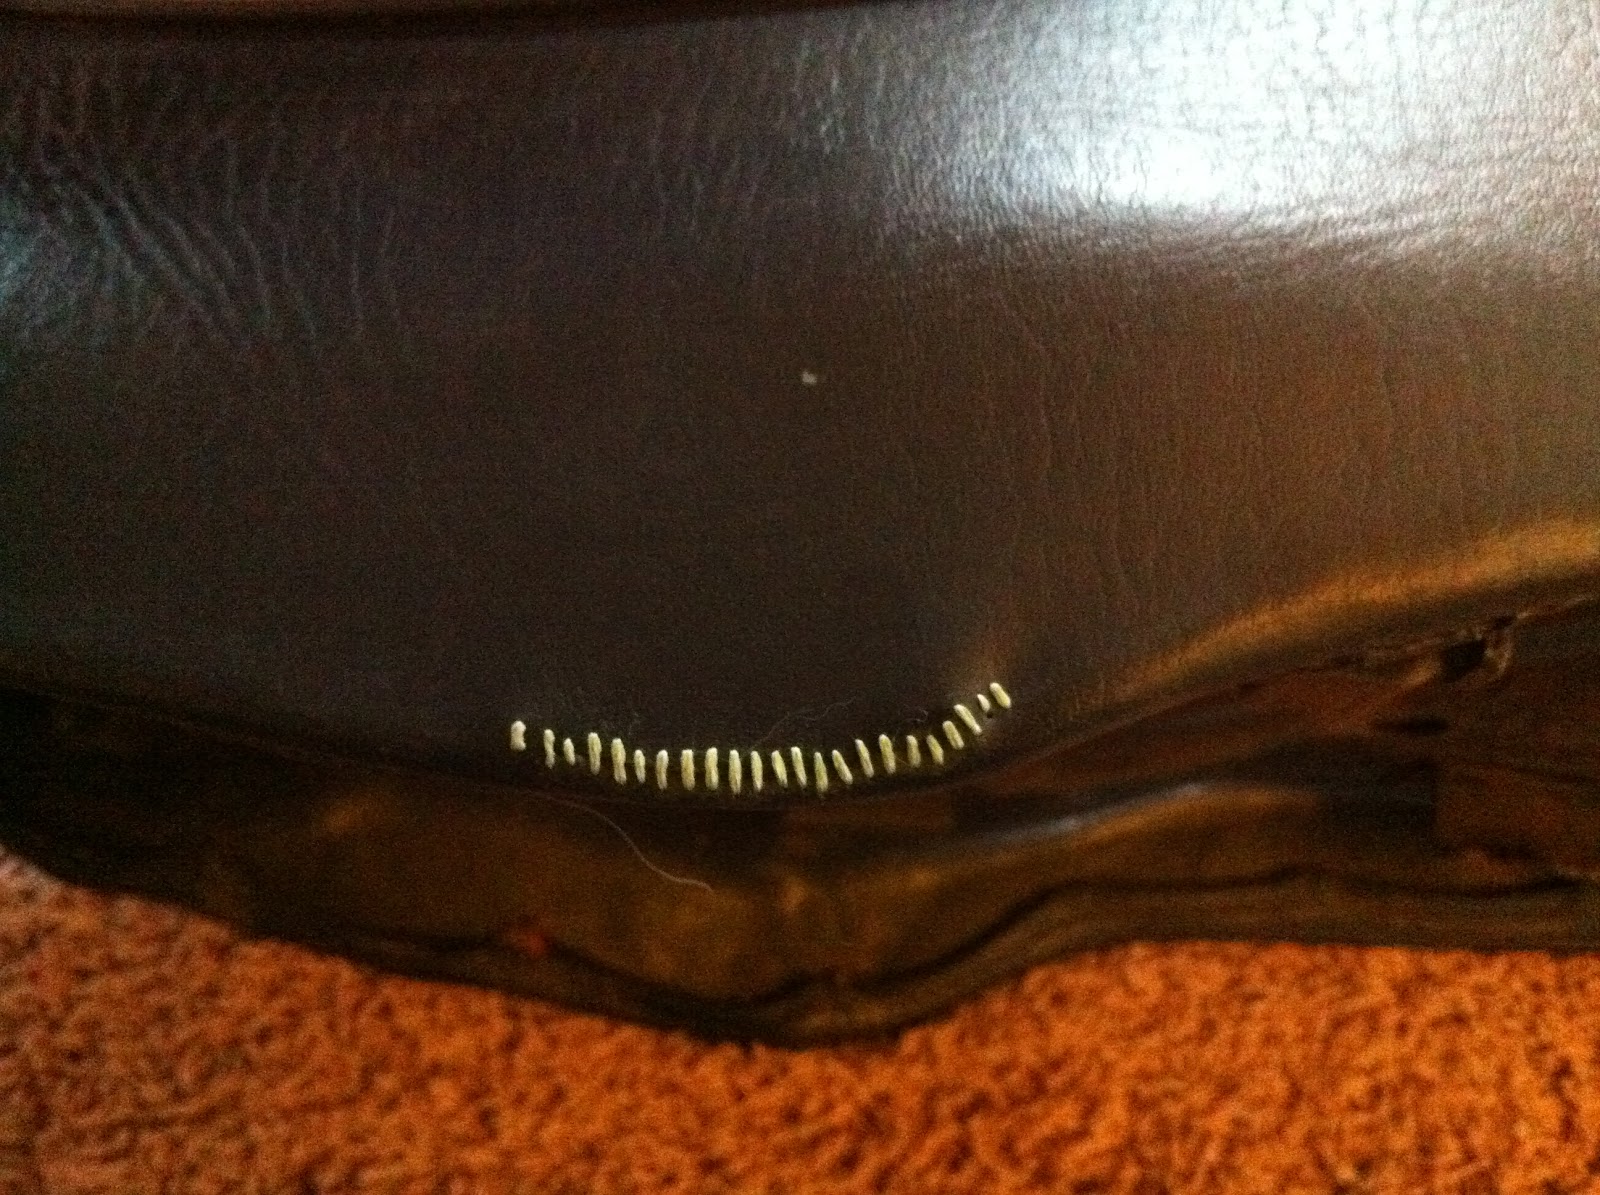
The next step was to go ahead and stitch the torn portions of the seat back together. I had initially tried just plain sewing thread and that proved too weak to even hold up to pulling the thread through the seat cover material and kept breaking. Racking my brain for something stronger that I had lying around the house to use I remembered that I had one fishing reel laying around that still had some “Spiderwire” on it now I hated this stuff on to fish with (that’s another story) but I figured I’d give it a go for use in my seat repair project.


The spiderwire worked amazingly well and while the color is not the best the strength is hard to beat and, the question now will be whether or not the edges of the torn material are strong enough to hold up to the pulling forces exerted on them when someone is sitting on the seat. I may still look for some sort of adhesive to apply to the seat cover for a second layer of repair but I am still in the process of looking into what is out there for that. I wish I could tell you more about what the stitch I used was called and how to do it but honestly I have no idea. My mom taught me how to sew probably 25 years ago and I was amazed that I could even remember how to do it. Below are some final pictures of the repair and the end result.


Thanks again for reading! I am going to set straight about writing another post about my start to the tuning up the engine using the process laid out in my Clymer manual so stay tuned!
I just found your blog. I liked the idea and decided to start my own...hope you don't mind my sniping your idea. I'm supposed to pick up an 87 450L tomorrow and I'll be documenting my processes as well. I appreciate the info you've shared and its definitely going to be of at least a little bit of assistance as this is my first bike.
ReplyDeleteShaun, I love the idea of another person posting their knowledge and experiences working on old bikes onto the internet. I figure that if something I learn can help someone else out and possible save them some time then it is time well spent. If you like share the link to your blog with me and I will share it here for others to use as well. I am sure I will get plenty of information from your experiences as well!
ReplyDeleteJuan
Juan - thanks for sharing your blog! I just obtained a 1981 Suzuki GS450L that I'm beginning to restore. Like you, I'm not trying to do anything fancy - just get her up and running again. Right now I've removed the rear tire and carbs and I'm trying to get the starter out. The automatic chain tensioner is in the way. My Haynes manual is a bit cryptic on how to remove it properly. Any tips? Thanks!
ReplyDelete-Bill
Bill,
ReplyDeleteYou do need to remove the automatic cam chain tensioner in order to get the starter out. On mine (and yours I think) the first thing you need to do is tighten the tensioner reatiner screw, that keeps the tensioner internals from popping out when you remove the tensioner. After you do that you can take out the three bolts that hold the tensioner in and remove it without too much headache. Be careful when tightening the tensioner bolts when you re-install the tensioner I snapped the head off one pretty easily with a short wrench.
Hope that helps! If you have more specific questions let me know! Thanks for reading!
Juan