Sunday, April 24, 2011

Getting Into it Now!


I decided that rather than try and guess around blindly about how to get the engine running properly that I would just start out with giving the bike a tune-up.  The Clymer manual that I have goes through a pretty detailed tune-up process and I am just starting from the beginning and working my way to the end.  The first thing that the manual has you do is check the valve clearance.
Step one is to remove the breather cover.

Looks like I am going to need a gasket set.

Step two was to remove the rocker end covers remove the valve cover bolts.


After that they have you remove the points cover, the spark plug wires and the plugs and finally the valve cover comes off.


At this point they have you rotate the crank around and check the valve/cam clearances for each of the intake and exhaust valves.  My feeler gauge set didn’t have a feeler gauge for the tightest tolerance but did have one for that was within the range (little larger than the tightest tolerance but smaller than the largest tolerance) this one did not slide in which means that the clearance are not too loose.  I might still go get a set that goes down to the proper tight tolerance size to make sure that for some reason that the clearances haven’t tightened up (which to me seems to defy logic).

Once you check the valve/cam clearances and they check out, you can move on to inspecting the points.  Referencing the diagrams in the book mine seem to be in great shape!


That is where I had to leave off for now.  The visual inspection is then followed up with a check and adjustment of the points’ clearance as well as a timing adjustment.  Stay tuned for that in the near future.
Thanks for reading!

Seat Repair


As I mentioned in the previous video I had decided to go ahead and repair the tears in the stock “king and queen” seat that came with the GS.  My main reason being that I am not entirely sure what direction this project is going to take just yet and if I can get the thing running reliably I might be riding it to and from work and around a bit just to get a feel for the bike and say what you will about the sheer and utter ugliness of the “king and queen” seat (I know I have) they are pretty darn comfortable.  I think that as I ride it about it will tell me what it really wants to be.  That being said I have never repaired a torn motorcycle seat before but it didn’t seem too intimidating so I figured I’d rather be riding a bike with a repaired seat than a torn seat.
In addition to the tear in the top of the seat (Above) there were two tears in the bottom most portion on each side of the seat where the seat material folds around the metal seat pan.


The seat cover is basically stretched over the Styrofoam seat padding and pan.  The outside edge of the seat cover has a decent sized wire stitched into the edge that runs around the whole cover.  Basically the assembler pulls the edge of the seat over the “hooks” punched out of the seat pan and as you can see in the picture (below), the hook then goes through the material and is held in place by the wire that is stitched around the seat cover.


Then it stands to reason that in order to remove the seat cover, all you have to do is pull the edges of the seat cover off the “hooks” and take the seat cover off the seat pan and Styrofoam padding.  There was some adhesive that was used during the original assembly of the seat that put up very little fight when removing the cover as well.  After I removed the cover you can see the resulting two pieces in the picture (below).   The plastic looking “stuff’ on the inside of the seat cover and on the Styrofoam padding I thing when the seat was new was all attached to where the black lines between the foam on the seat cover and served as a barrier between the two foams and probably served as a place to spray the seat adhesive.  Unfortunately over the last 31 tears the plastic has degraded and this is the result.

Pushing ahead I removed all the old brittle plastic from both the seat cover and seat padding and the pic (below) shows the end result.

The next step was to go ahead and stitch the torn portions of the seat back together.  I had initially tried just plain sewing thread and that proved too weak to even hold up to pulling the thread through the seat cover material and kept breaking.  Racking my brain for something stronger that I had lying around the house to use I remembered that I had one fishing reel laying around that still had some “Spiderwire” on it now I hated this stuff on to fish with (that’s another story) but I figured I’d give it a go for use in my seat repair project.

The spiderwire worked amazingly well and while the color is not the best the strength is hard to beat and, the question now will be whether or not the edges of the torn material are strong enough to hold up to the pulling forces exerted on them when someone is sitting on the seat.  I may still look for some sort of adhesive to apply to the seat cover for a second layer of repair but I am still in the process of looking into what is out there for that.  I wish I could tell you more about what the stitch I used was called and how to do it but honestly I have no idea.  My mom taught me how to sew probably 25 years ago and I was amazed that I could even remember how to do it.  Below are some final pictures of the repair and the end result.


Thanks again for reading!  I am going to set straight about writing another post about my start to the tuning up the engine using the process laid out in my Clymer manual so stay tuned!

Friday, April 15, 2011

The Better To See You With My Dear


Today I spent a little time with the GS 425L and got the headlight brackets re-bent and re-installed onto the fork legs again.  All the measuring and sketching I did was for naught as after a quick search I found some photos of unmolested brackets on Ebay and was able to discern that they should be bent at basically 90 degree angles.


Once I got the brackets back on I went ahead and reinstalled the turn signals and then ran the wires back through the headlight bucket and reconnected them. You can see in the above picture that the headlight is a actually centered on the triple trees now.

In the preceding picture here you can see that the turn signals stalks are now in line with each other and at 90 degree angles with the longitudinal axis of the bike now too.  Mission accomplished!  I'm still not sure what I am going to do about the turn signals in the long run, the more I look at the stockers the more ridiculous they look to me, like giant lollipops.  I might try something as simple as shorter stalks for and try to bring them in closer to the headlight at first and see how that looks.


Once all the connections were re-established I cleaned the old headlight bulb off because I was handling it with bare hands a lot (a headlight no no) and reinstalled it on the bike just to see if it would burn out or not, I do have the brand new one just in case but why open that if the old one still works? As you can see in the in first picture of this post the headlight worked fine and so far hasn't burned out!


I also picked up a new battery for the bike to replace the Energizer brand battery that was on the bike when I got it.  The kid that owned the bike before me told me the battery was new but it's performance after many charges over the winter told a different story.  So a trip to one of the local Suzuki dealers netted me a direct replacement Yuasa battery for the bike.  The Energizer barely squeezed into the battery tray with the top of the battery rubbing against the top frame tube.  As you can see in the above picture this new one fits a lot better!


The next thing on the list to do for the day was to replace the sprak plugs.  The old ones did spark but at $2.25 a piece it would be foolish to sit and wonder why your bike won't idle and not replace these cheap things first.

Can you tell which ones are the new ones?


In the video below you will see why this picture is funny, I stopped to take a picture of the newly installed plugs and it just goes to show you what happens when you break your train of thought.


So yeah... there is no limit to my absentmindedness  sometimes!

I am going to have to post this video over in the "Technical" forum over at CafeRacer.net and see if I can get any input as to what is going on with the bike and why it won't idle.  There are a lot of old bike gurus over there that just might be pick up something obvious that I am missing (Sometimes that can be as obvious as not having the spark plug wires disconnected).

I did start in on repairing that seat tonight as well, I'm no upholsterer but  hopefully I will have pretty good success with my attempts.  That and more to come in my next update, coming sooner than later!  Thanks again for reading!

Friday, April 1, 2011

The "Low Slinger" Pops its First Wheelie

This morning marked the end of my four say stint on night shifts.  I got home at 7am and not wanting to sleep the whole day away like I did the last time I came off nights I set the alarm for noon and planned on redeeming myself from the botched attempt to pull the headlight brackets off the forks earlier in the week.


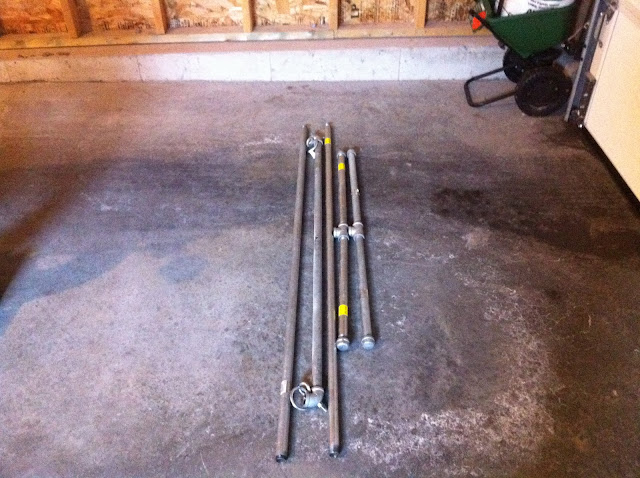
So I headed to the local hardware store to get a new 5' length of 3/4" threaded galvanized pipe and two 18" lengths of 3/4" threaded galvanized pipe and couple end caps that had gone missing at some point in the years I have moved my bike hoist around.  After getting the whole thing assembled this time, everything went to plan and I got the bike lifted off the ground with ease.


As you can see below the hoist when properly assembled sturdily holds up the GS quite well, it also does a good job with my SV650 and after a buddy of mine who built his own after seeing mine was able to lift his entire ZX10R off the ground with mine at the front and his at the back.  They are quite useful for suspension work and I've also used mine for when I need to replace steering stem bearings or pull the triple trees.


A quick note here, always break the nuts on the triple trees before you lift the bike off the ground it makes thing much easier and safer.  Once I got the bike in the air I finished loosening the nuts on the triple trees ans with a little coaxing I was able to get the forks slid down enough to get the headlight brackets out, as well as that gaudy piece of plastic that "dresses up" the lower triple clamp.


It already feels cleaner I actually was thinking about keeping the stock signals they have a definite old school feel to them and I wouldn't need to spend any money on new turn signals then, Perhaps there is a way to customize them a little bit so they aren't so gaudy.  The front does look much cleaner without them!


One of the other things I really like about my bike hoist is how small it breaks down.  It hardly takes up any garage space when disassembled.


After I got everything cleaned up all that was left was to sit down and figure out how to re-bend the brackets so that the headlight will be straight as well as the turn signals.


The next step is to attend a garage beer session at my good friends place and get these bad boys bent back to the proper shape.  Once I get that done I will probably re-paint them a gloss black before I put them back on the bike.  That is probably all I will get done this weekend as I have some painting to do around the house but look for an update later next week!